Where To Put Microphone On Desk? – Pro Tips
I shine as a live streamer when I can engage my audience with compelling stories. But last week, I started facing microphone issues. Even the most skilled streamers occasionally run into technical issues, which can dull the excitement.
Imagine this: I’m ready to start an epic story that will take my audience to a wondrous world of adventure. My microphone starts to create a trouble as I continue the story. My voice is distorted by its uneven signal, which makes the perfectly planned narrative I was trying to tell a chaotic mess.
After facing such awful situations, I decided to place my microphone in a proper place. Wouldn’t it be great if I shared my idea on where to place the microphone on the desk? Let’s get started.
Why Do You Need a Perfect Location For The Mic?
You’ve heard the advice a million times to set your microphone on the desk. But the question here is, Why do you need a perfect location for the mic?
So here is the answer:
By placing the microphone in the correct spot, the intended sound will be accurately captured. The microphone’s position and orientation can have an impact on how well it captures crystal-clear audio and reduces undesirable background noise.
Having the microphone positioned correctly is essential when utilizing a microphone for communication, such as during video conferences, interviews, or podcasting. The microphone can be used with ease if it is placed in a practical and comfortable location on the desk. It guarantees that the microphone is accessible and that it may be changed or muted without feeling uncomfortable.
Now, comes the best part so here we go.
Where To Put Microphone On Desk?
There are a few things to take into account while mounting a microphone on a desk to get the best audio possible and avoid any trouble. Here are some tips that I use to place the microphone on the desk.
Here we go,
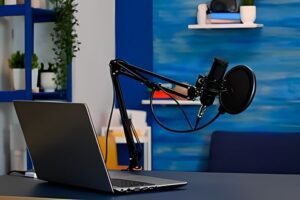
- If you can’t get it in the back, consider installing it on the side of the desk and pulling it further over towards your display. Anything you can do to move it away from the desk’s front edge will help you have more room.
- As long as the stand is durable and doesn’t hit any of the monitors, I sometimes place the mic stand behind the monitors and have it facing me. This works okay. You can also try this setup as well.
Depending on the type of microphone, the sound source, and the acoustic setting, there are various methods to put your microphone on your desk. Here are some broad recommendations.
- The majority of experts advise keeping the microphone 4 to 6 inches or less away from your mouth. Depending on your configuration, this will vary, but at this distance, the location of your microphone will be adequate to pick up crystal-clear speech without taking up too much background noise.
- To obtain the finest sound quality and tone, you can also experiment with the position and angle of your microphone. You may place your microphone off-axis, which involves angling it a little bit away from the sound source. Plosives, sibilance, and harshness can be lessened as a result.
- You can also place your microphone above or below your mouth and tilt it either in your direction or away from it. This may also change the sound’s qualities and aid in preventing popping or breathing noises.
- Additionally, you can play with the height and separation of your desk’s microphone. For instance, you can lift your microphone above your desk and shield it from noises and vibrations by using a boom arm or a shock mount.
So yes, it was all about where to place the microphone on the desk. Okay, I know what you are thinking now. Let’s switch to the next part to learn where to place the mic arm on the desk. Or how to?
How To Position Microphone Arm?
Correctly positioning a microphone arm is essential for attaining the best sound quality and minimizing background noise. Here is a step-by-step tutorial on how to place a microphone arm to get the best results:
1. Find the proper location:
Find a place for your microphone arm that is convenient, can clearly record your speech, and is easily accessible. Think about things like the distance between you and the microphone, the acoustics of the room, and background noise.
2. Mount the arm firmly:
Using the included clamp or base, fasten the microphone arm to a stable surface, such as a desk or table. In order to prevent any movement or vibration during recordings, make sure the arm is firmly secured.
3. Raising or lowering the arm:
Set the microphone arm’s height so that it is level with your mouth or the sound source you want to record. Aim to position the microphone so that it is roughly parallel to the sound source or your mouth.
4. Keep enough space:
Keep enough space between your mouth and the microphone. Depending on the microphone and the desired audio quality, this distance may change.
5. Arrange the microphone:
To improve sound capture, tilt the microphone slightly upward or downward. To choose the location that produces the finest audio quality, try out several angles. As this may, avoid directing the microphone directly at your mouth or any other sources of breath noise.
6. Taking note of a pop filter:
To lessen plosive sounds produced by breath directly striking the microphone capsule while using a microphone arm for vocal recordings, place a pop filter between the microphone and your lips.
7. Test and adjust:
After positioning the microphone arm, record a sound source to check the audio quality. Keep an ear out for any obtrusive noise, distortion, or unbalanced sound levels. To get the desired results, alter the arm’s position as necessary.
Just follow the steps wisely and enjoy a disturbance-free microphone.
Conclusion:
For high-quality audio recording, a desk microphone placement is essential. You can significantly improve the quality of your audio recording by taking into account variables like distance from the sound source, microphone type, desk surface, isolation, desk positioning, pop filter usage, cable management, and testing.